
Hi all,
Quick introduction is the game is called Tanks and more details about the game will follow later since right now is time critical.
But just to begin,
1) The board is a 20x20 grid
2) 5 players play at the same time
3) There are 4 different times of terrain - Ground, Brick wall, Water, Stone wall
5) Other sprites include coins and health packs
6) Multiplayer, it communicated through a central socket-server
What you need
1) python 2.7 installed
2) pygame library installed
pygame is available as a standalone installer for windows, for most unix releases you can get it through standard repos (package python-pygame)
What is pygame
A very small 2D game development engine. It just covers the basic graphics handling like dealing with the graphics drivers and all, but on the other hand it leaves us with a lot of flexibility in coding. Also the learning curve for the syntax is almost non-existing! If you know your python, this is a piece of cake. If not well still learning python is pretty easy :D
Part 1 : Board generation
All the codes will be available on https://github.com/ManZzup/Tanks
In this section I would quickly cover the basics of pygame, and how to generate a board from a given input. I said generate because we will only receive a set of instructions from our multiplayer server. So we will construct the game generation accordingly.
Step 1 : Introducing pygame
This program just opens up a window and print some images on to it. This is the fundamental of game creation. If we need to animate all we need is to extend this to draw the same images again and again in a very rapid motion.So if you know to draw an image and to clear it, you can basically do animations!
Save this as tanks.py and run (python tanks.py)
If all goes good (fingers crossed) you will see a black screen with your image on it.
Step 2 : Making board cell
Let's get down to the real thing. SO to start off as i mentioned there are 4 types of board cells:
1) Ground cell
2) Water cell
3) Brick wall cell
4) Stone wall cell
So in pygame, each of these are called Sprites (read about them at pygame docs). Basically we would create python classes that extend the pygame.sprite.Sprite class
Why-- because Sprites deal with alot of other things like collision detection, Groups bla bla we'll come to them later
We start off by making a Ground Cell
Make sure you put ALL YOUR image files as the SAME directory as the script
Now let's modify our tanks.py to see how our cell looks like
When you run with python tanks.py you will see a small brown square in a huge black screen. IT WORKS!
Now i assume that you did the same for other cells as well, so i won't be covering that.
Step 3 : Making the Board Class
Our board class is basically a data structure that would hold
1) A data grid (2D int array)
2) All the cell sprites for all 400 cells
3) Any other board related info
So th following Board class defines all these. Note the concept of Group (pygame.sprite.Group) used here. A Group is a set of Sprites, the advantage is that when we group similar Sprites, we can apply some functions like drawing, scaling, collision detection onto them as a group.
Saves us a lot of coding and also it is efficient.
What's the data grid
Since our server will send us the info about various units in a very complicated form, I decided that those should be stored in a very efficient manner. SO the option I selected was to use an integer array (2D int array) to define each cell of our board. So how we define all the elements we have is here
We use 0 to indicate a Ground cell
0 - Ground cell
-1 - Brick cell
-2 - Stone cell
.....
10 - Player 1 Direction North
11 - Player 2 Direction East
12
13
20 - Player 2 Direction North
and likewise
So by referring to the above chart, in our Board class, first we define a method that would get the positions of each elements, populated by the server and mention them in the grid.
And the second method, draw_board is to loop those elements and construct the board by fixing the relevant cells.
<<code to be added, check github>>
Again I assumed that you complete the above chart in a way that suits you plus the Cell classes.
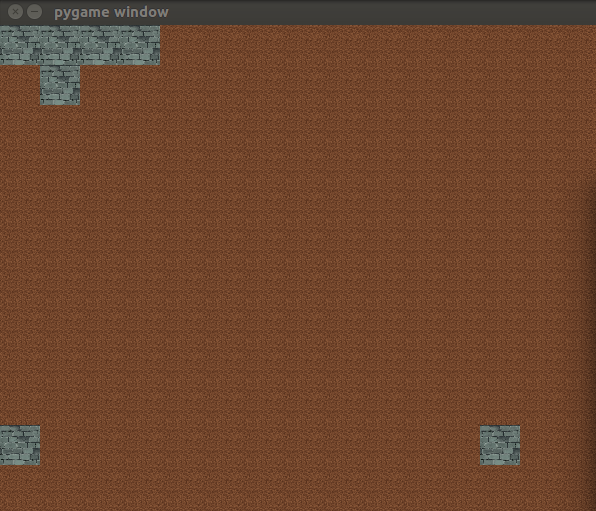
Step 4 : Check board generation
Finally we just need to check if our board generation works. First we create a board instance and then manually feed the location of some brick walls. See that we just send a list of positions, just as we get them from the game server. This way when we finally communicate with server, we have less work to do on our side.
Then we call the draw_board function finally the cells.draw() function
Here's where the Group came useful. If not for the cells Group, we would have to iterate each and every cell and blit it to the screen. But here Group takes care of it ^_^.
Check your code with the following modified tanks.py
<<again due to some error, please check the code at github>>
DONE! So the first step is done, now i would say around 15% is completed. (Given that you take the extra step and construct the other cells, and do MODIFICATIONS as necessary)
Next is to communicate with the server,coming in Part 2.
Cyah
Quick introduction is the game is called Tanks and more details about the game will follow later since right now is time critical.
But just to begin,
1) The board is a 20x20 grid
2) 5 players play at the same time
3) There are 4 different times of terrain - Ground, Brick wall, Water, Stone wall
5) Other sprites include coins and health packs
6) Multiplayer, it communicated through a central socket-server
What you need
1) python 2.7 installed
2) pygame library installed
pygame is available as a standalone installer for windows, for most unix releases you can get it through standard repos (package python-pygame)
What is pygame
A very small 2D game development engine. It just covers the basic graphics handling like dealing with the graphics drivers and all, but on the other hand it leaves us with a lot of flexibility in coding. Also the learning curve for the syntax is almost non-existing! If you know your python, this is a piece of cake. If not well still learning python is pretty easy :D
Part 1 : Board generation
All the codes will be available on https://github.com/ManZzup/Tanks
In this section I would quickly cover the basics of pygame, and how to generate a board from a given input. I said generate because we will only receive a set of instructions from our multiplayer server. So we will construct the game generation accordingly.
Step 1 : Introducing pygame
This program just opens up a window and print some images on to it. This is the fundamental of game creation. If we need to animate all we need is to extend this to draw the same images again and again in a very rapid motion.So if you know to draw an image and to clear it, you can basically do animations!
Save this as tanks.py and run (python tanks.py)
If all goes good (fingers crossed) you will see a black screen with your image on it.
Step 2 : Making board cell
Let's get down to the real thing. SO to start off as i mentioned there are 4 types of board cells:
1) Ground cell
2) Water cell
3) Brick wall cell
4) Stone wall cell
So in pygame, each of these are called Sprites (read about them at pygame docs). Basically we would create python classes that extend the pygame.sprite.Sprite class
Why-- because Sprites deal with alot of other things like collision detection, Groups bla bla we'll come to them later
We start off by making a Ground Cell
Make sure you put ALL YOUR image files as the SAME directory as the script
Now let's modify our tanks.py to see how our cell looks like
When you run with python tanks.py you will see a small brown square in a huge black screen. IT WORKS!
Now i assume that you did the same for other cells as well, so i won't be covering that.
Step 3 : Making the Board Class
Our board class is basically a data structure that would hold
1) A data grid (2D int array)
2) All the cell sprites for all 400 cells
3) Any other board related info
So th following Board class defines all these. Note the concept of Group (pygame.sprite.Group) used here. A Group is a set of Sprites, the advantage is that when we group similar Sprites, we can apply some functions like drawing, scaling, collision detection onto them as a group.
Saves us a lot of coding and also it is efficient.
What's the data grid
Since our server will send us the info about various units in a very complicated form, I decided that those should be stored in a very efficient manner. SO the option I selected was to use an integer array (2D int array) to define each cell of our board. So how we define all the elements we have is here
We use 0 to indicate a Ground cell
0 - Ground cell
-1 - Brick cell
-2 - Stone cell
.....
10 - Player 1 Direction North
11 - Player 2 Direction East
12
13
20 - Player 2 Direction North
and likewise
So by referring to the above chart, in our Board class, first we define a method that would get the positions of each elements, populated by the server and mention them in the grid.
And the second method, draw_board is to loop those elements and construct the board by fixing the relevant cells.
<<code to be added, check github>>
Again I assumed that you complete the above chart in a way that suits you plus the Cell classes.
Step 4 : Check board generation
Finally we just need to check if our board generation works. First we create a board instance and then manually feed the location of some brick walls. See that we just send a list of positions, just as we get them from the game server. This way when we finally communicate with server, we have less work to do on our side.
Then we call the draw_board function finally the cells.draw() function
Here's where the Group came useful. If not for the cells Group, we would have to iterate each and every cell and blit it to the screen. But here Group takes care of it ^_^.
Check your code with the following modified tanks.py
<<again due to some error, please check the code at github>>
DONE! So the first step is done, now i would say around 15% is completed. (Given that you take the extra step and construct the other cells, and do MODIFICATIONS as necessary)

Next is to communicate with the server,coming in Part 2.
Cyah
This comment has been removed by the author.
ReplyDeleteYou and your team need a playground that will provide the online space for you to. How and where does all that information get processed? There are two main methods.serwery minecraft
ReplyDeletehttps://margaretlafauci.blogspot.com/2013/04/biggest-endeavor.html?showComment=1537425712196#c3244151515309646545
ReplyDeletehttps://margaretlafauci.blogspot.com/2013/04/biggest-endeavor.html?showComment=1537425712196#c3244151515309646545
ReplyDeleteThank you for the information, i found the information very useful. If anyone looking for Python programming training in Bangalore i suggest Apponix Technologies, they provide best Python Programming training. For more information visit : https://www.apponix.com/Python-Institute/Python-Training-in-Bangalore.html
ReplyDeleteThanks for sharing such a great blog Keep posting..
ReplyDeletePython Training in Gurgaon
Python Course in Gurgaon